
Undercarriage Inspections on the Web App
Inspections can be entered via the Web Application (web browser) or from the Mobile Application. For help with entering inspections from the Mobile Application, please see below. Adding inspections via the Web Application can be useful when entering historical inspections to ensure complete historical records for equipment.
Inspections can be entered from both the equipment details page, or the menu link
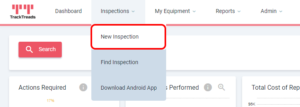
Navigate to New Inspection:– Inspections > New Inspection
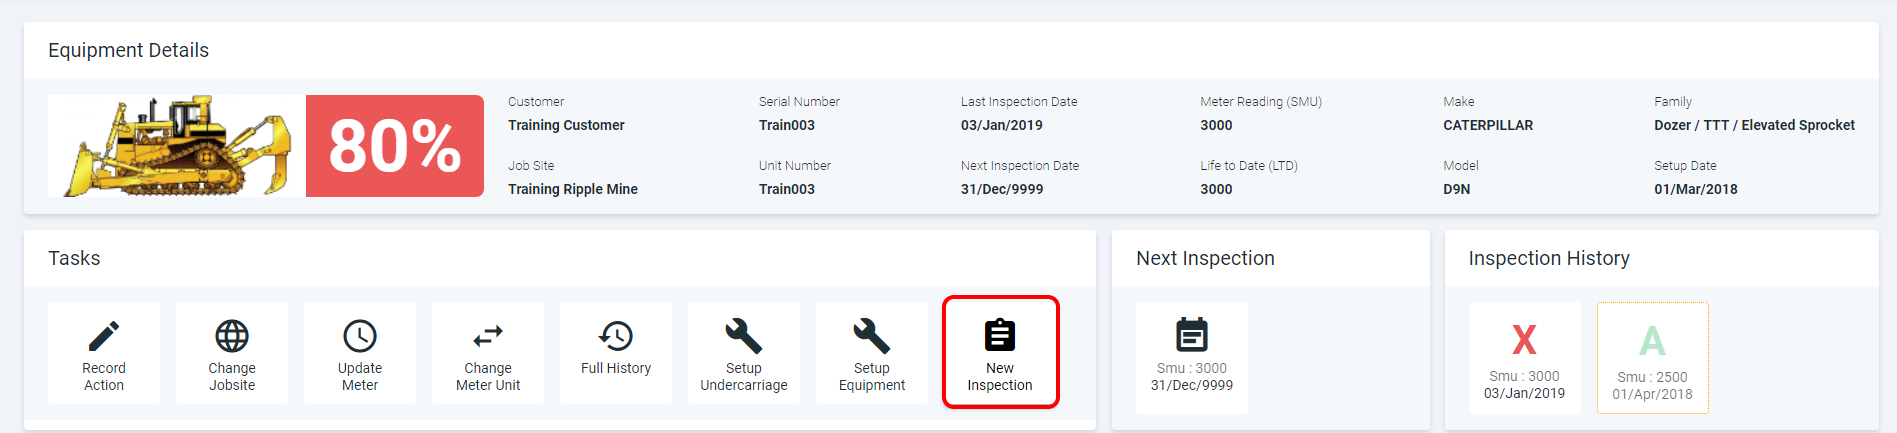
 Alternatively, navigate to a specific piece of equipment, and select "New Inspection" from the Equipment Details page

 Alternatively, navigate to a specific piece of equipment, and select "New Inspection" from the Equipment Details page
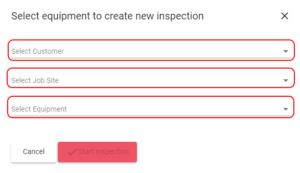
- Use the ‘Equipment Selection’ to locate the equipment.
- Enter Initial Fields
 Select the bushing allowable wear – this will default to lesser.
- Enter the track sag, number of dry joints, and cannon extension for the equipment.
- Underfoot Conditions, please use the tick boxes to show the conditions.
- Enter any Inspection and Jobsite Notes as required.
- Undercarriage Unit of Measure will default to mm, please change this inches if required. (this can be set on the user preferences screen).
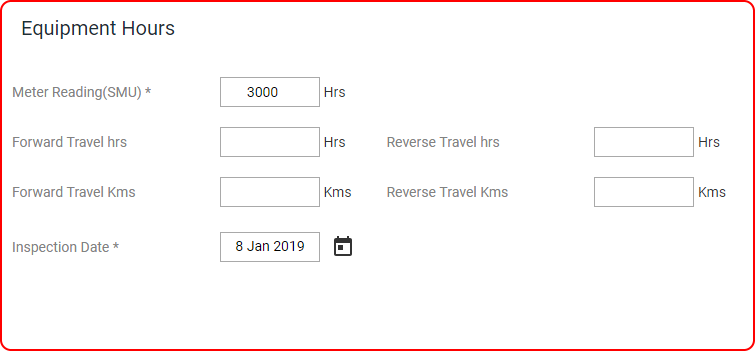
- Enter the Inspector, Date and SMU.
- Leave the Docket number as the system will automatically generate one.
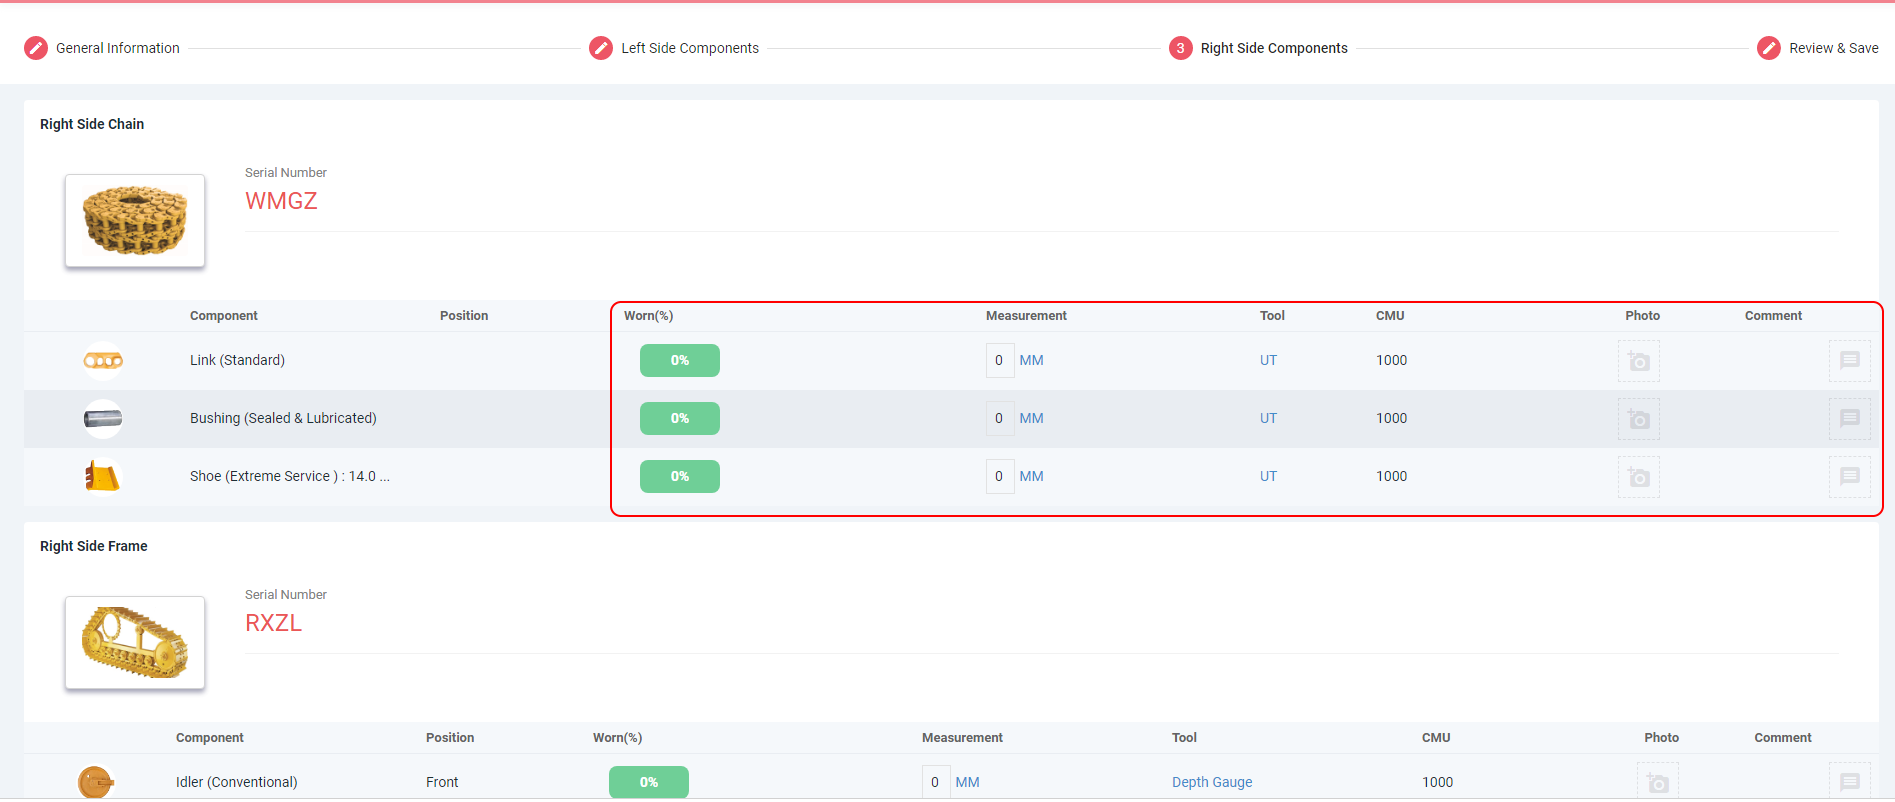
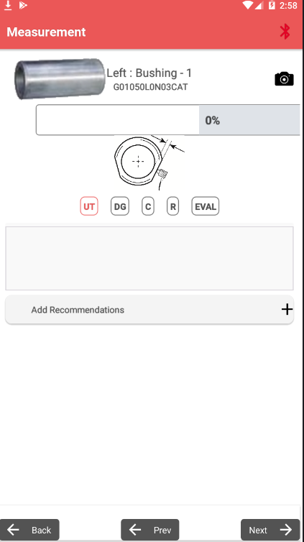
- Enter the measurements of the components for the left and right side as required.The default tool will show but if a different tool is used this needs to be selected.
- Should you use a tool that does not have any wear limits against the tool the calculated percentages will not show.

- Should you use a tool that does not have any wear limits against the tool the calculated percentages will not show.
- Click on ‘SAVE/INTERPRET’


Undercarriage Inspections on the Mobile App
Inspections can be entered via the Mobile Application or from the Web Application (web browser). Ideally inspections done on the Mobile App are performed on equipment that has already been setup in the system. You can setup equipment on the Mobile App, but it is not our recommended method, we recommend setting up equipment in the Web Application first. To setup equipment from the Web App see ‘Setting Up, Searching for and Editing Equipment‘. There may be occasions when you need to setup equipment on the Mobile App, and that is covered at the end of this guide.
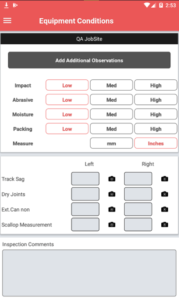
 4. Equipment Conditions
Input the readings for Track Sag on the left and right, Dry Joints on the left and right, Cannon Exterior on the left and right, and the Scallop Measurement on the left and the right, as well as any inspection photos or comments and job site comments in the bottom fields.
You are also able to add any additional observations for the equipment
If you have any issues or would like assistance with what these fields mean in the system – please check out our website – with all the definitions - http://help.tracktreads.com/
4. Equipment Conditions
Input the readings for Track Sag on the left and right, Dry Joints on the left and right, Cannon Exterior on the left and right, and the Scallop Measurement on the left and the right, as well as any inspection photos or comments and job site comments in the bottom fields.
You are also able to add any additional observations for the equipment
If you have any issues or would like assistance with what these fields mean in the system – please check out our website – with all the definitions - http://help.tracktreads.com/
 5. Select "Inspect"
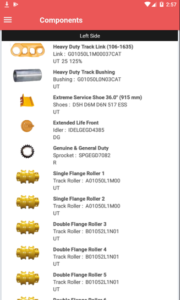 6. Select each installed component in the Equipment, measure and input readings using the Ultrasonic Tool, Depth Gauge, Caliper. Ruler or the Eval tool for parts that cannot be measured. Also input any inspection comments or photos of components here. Then click "Freeze" and "Save".
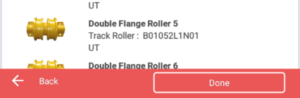
 7. Once all necessary components have been inspected, press, "DONE".
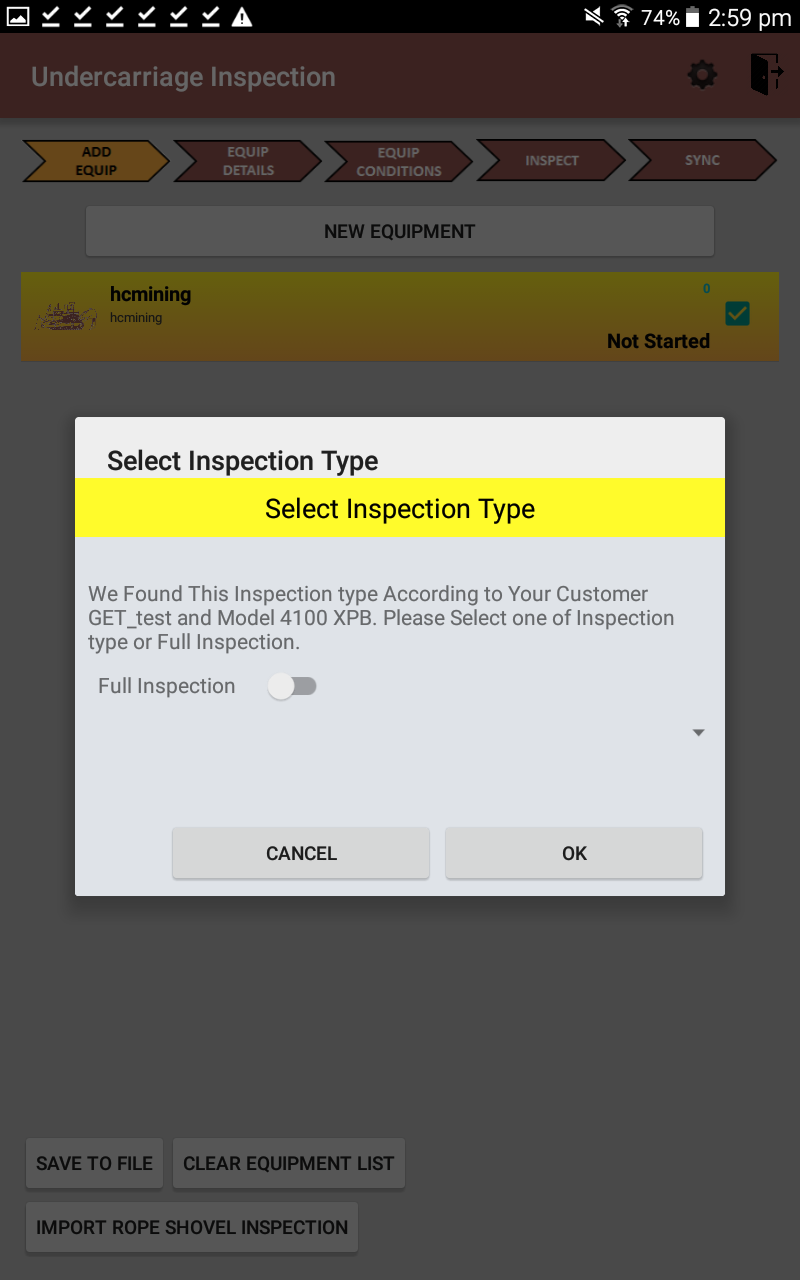
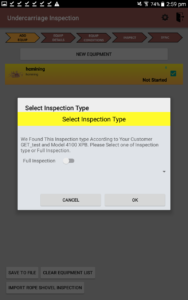 1. Select the equipment you wish to inspect.
2. Select the Inspection type you are conducting.
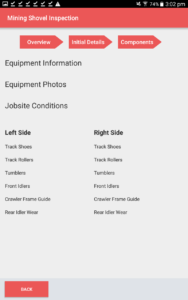
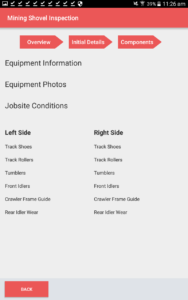
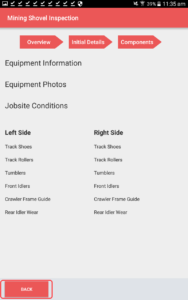
3. Click on Equipment Information.
1. Select the equipment you wish to inspect.
2. Select the Inspection type you are conducting.
3. Click on Equipment Information.
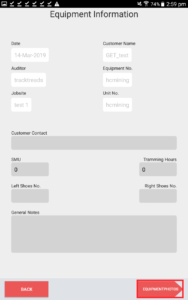
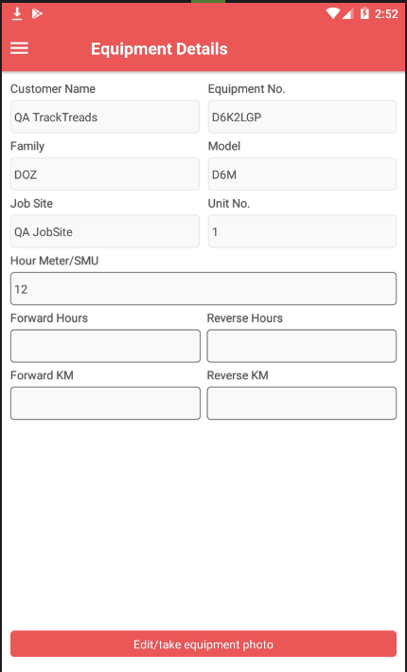
 4. Enter SMU and tramming hours.
5. Enter No. of Left shoes and No. Right shoes.
6. Add general notes.
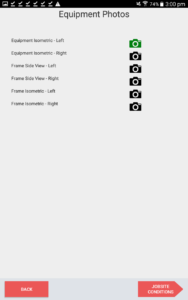
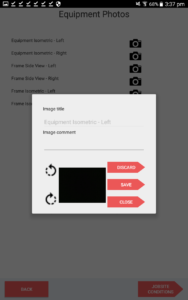
7. Press Equipment photos in the bottom right corner.
4. Enter SMU and tramming hours.
5. Enter No. of Left shoes and No. Right shoes.
6. Add general notes.
7. Press Equipment photos in the bottom right corner.
 8. Click on a camera and add images and comments for each item.
 9. Save and continue.
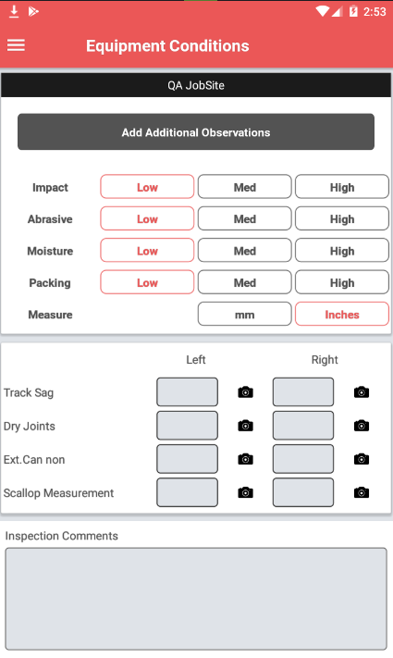
 10. Press Jobsite Conditions in the bottom right corner.
11. Add overall observation comments.
12. Choose a measurement unit.
13. Select conditions for Impact, Abrasive, Packing and Moisture and add images.
14. Press back in the bottom left corner.
10. Press Jobsite Conditions in the bottom right corner.
11. Add overall observation comments.
12. Choose a measurement unit.
13. Select conditions for Impact, Abrasive, Packing and Moisture and add images.
14. Press back in the bottom left corner.
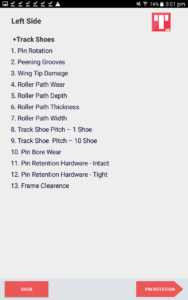
 15. Select the first component -track shoes on the left side.
16. Enter number of shoes and photos for both sides.
15. Select the first component -track shoes on the left side.
16. Enter number of shoes and photos for both sides.
 17. Press next.
 18. Select the first component under track shoes.
19. Enter images and comments for pin rotation, peening grooves and wing tip damage.
18. Select the first component under track shoes.
19. Enter images and comments for pin rotation, peening grooves and wing tip damage.
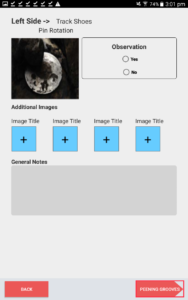 20. Continue through the inspection by pressing the button in the bottom right hand corner
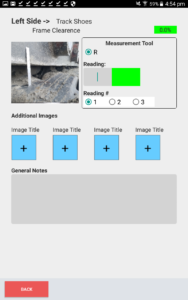
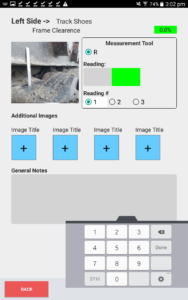 21. Enter measurement tool, readings, images and comments for each and continue.
22. When you reach the last component on the left side press back in the bottom left corner.
21. Enter measurement tool, readings, images and comments for each and continue.
22. When you reach the last component on the left side press back in the bottom left corner.
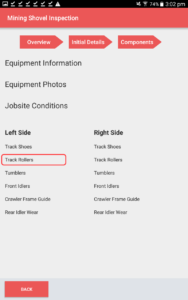
 23. Select track rollers on the left hand side.
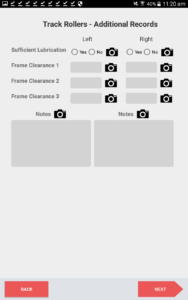
 24. Enter additional records for track rollers.
 25. Press next.
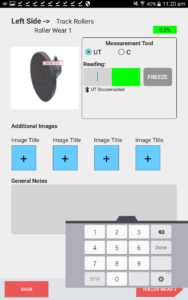
 26. Continue through each roller wear entering measurements, measurement tool use, adding comments and images.
 27. Press back until you return to the main screen. Press Tumblers.
 28. Enter additional records to tumblers.
29. Press next. Add images and continue.
30. Enter required information for sufficient lubrication, thrust washer present and tooth wear dimensions and return to main screen.
31. Press Front Idlers.
32. Enter additional records for front idlers.
33. Press next. Add images and continue.
34. Enter required information for all options and return to main screen.
35. Continue steps for all required.
36. Complete same steps on right side.
37. Press back in the bottom left corner
28. Enter additional records to tumblers.
29. Press next. Add images and continue.
30. Enter required information for sufficient lubrication, thrust washer present and tooth wear dimensions and return to main screen.
31. Press Front Idlers.
32. Enter additional records for front idlers.
33. Press next. Add images and continue.
34. Enter required information for all options and return to main screen.
35. Continue steps for all required.
36. Complete same steps on right side.
37. Press back in the bottom left corner
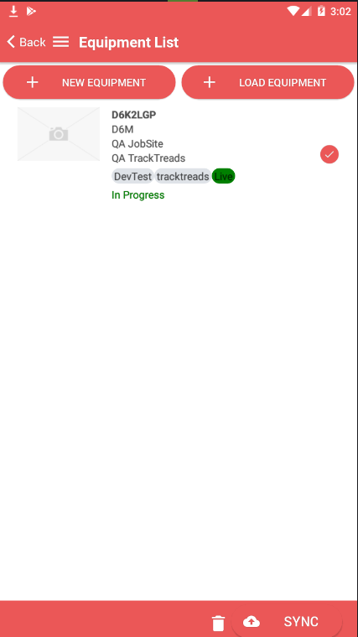
 38. Click to select equipment - a tick will appear.
 39. Press sync.
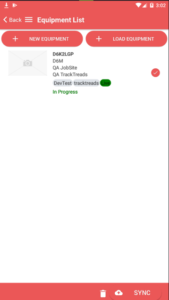
Inspecting Previously Setup Equipment
Once you have logged into the Mobile App, there are 3 phases to performing an inspection, loading the equipment into the App, entering the inspection and syncing the inspection with the system. If you have not already done so, install the Mobile App on your device. For assistance with installing the Mobile App see: Installing the Mobile App.Performing an Inspection on the Mobile App
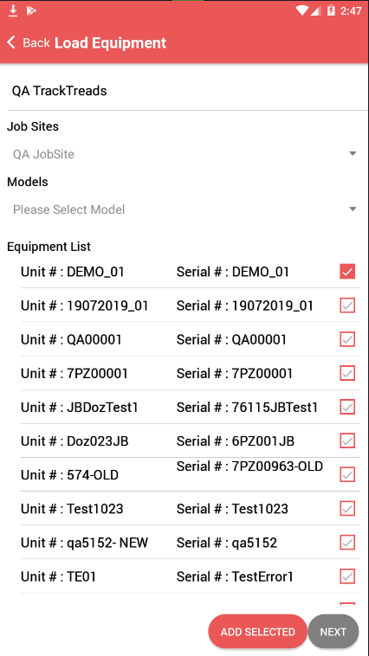
1. Then select the Option Undercarriage Inspection 2. Click on Load Equipment and then select the equipment you wish to inspect and click on Add Selected & then Next
 4. Equipment Conditions
Input the readings for Track Sag on the left and right, Dry Joints on the left and right, Cannon Exterior on the left and right, and the Scallop Measurement on the left and the right, as well as any inspection photos or comments and job site comments in the bottom fields.
You are also able to add any additional observations for the equipment
If you have any issues or would like assistance with what these fields mean in the system – please check out our website – with all the definitions - http://help.tracktreads.com/
4. Equipment Conditions
Input the readings for Track Sag on the left and right, Dry Joints on the left and right, Cannon Exterior on the left and right, and the Scallop Measurement on the left and the right, as well as any inspection photos or comments and job site comments in the bottom fields.
You are also able to add any additional observations for the equipment
If you have any issues or would like assistance with what these fields mean in the system – please check out our website – with all the definitions - http://help.tracktreads.com/
 5. Select "Inspect"
 6. Select each installed component in the Equipment, measure and input readings using the Ultrasonic Tool, Depth Gauge, Caliper. Ruler or the Eval tool for parts that cannot be measured. Also input any inspection comments or photos of components here. Then click "Freeze" and "Save".
 7. Once all necessary components have been inspected, press, "DONE".

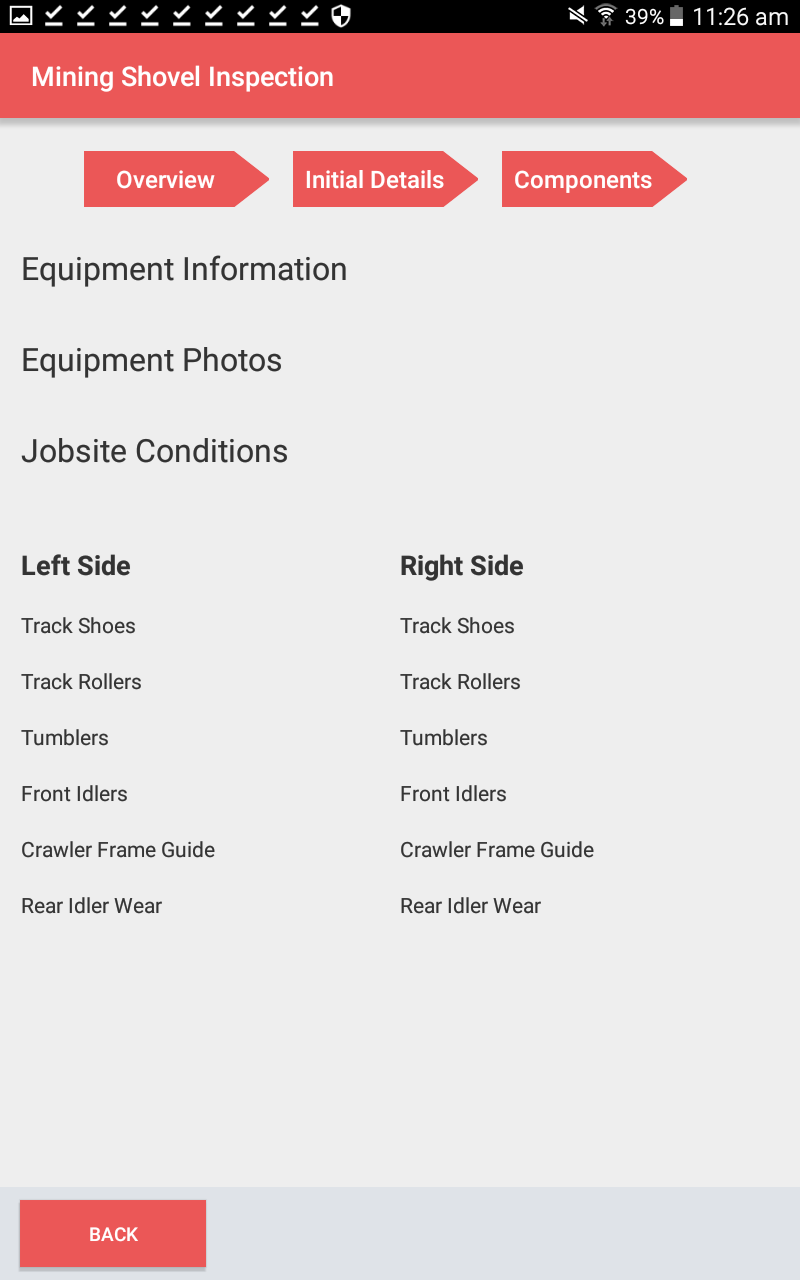
Performing an Inspection on Mining Shovel on Mobile App
 1. Select the equipment you wish to inspect.
2. Select the Inspection type you are conducting.
3. Click on Equipment Information.
1. Select the equipment you wish to inspect.
2. Select the Inspection type you are conducting.
3. Click on Equipment Information.
 4. Enter SMU and tramming hours.
5. Enter No. of Left shoes and No. Right shoes.
6. Add general notes.
7. Press Equipment photos in the bottom right corner.
8. Click on a camera and add images and comments for each item.
9. Save and continue.
4. Enter SMU and tramming hours.
5. Enter No. of Left shoes and No. Right shoes.
6. Add general notes.
7. Press Equipment photos in the bottom right corner.
8. Click on a camera and add images and comments for each item.
9. Save and continue.
 10. Press Jobsite Conditions in the bottom right corner.
11. Add overall observation comments.
12. Choose a measurement unit.
13. Select conditions for Impact, Abrasive, Packing and Moisture and add images.
14. Press back in the bottom left corner.
15. Select the first component -track shoes on the left side.
16. Enter number of shoes and photos for both sides.
17. Press next.
10. Press Jobsite Conditions in the bottom right corner.
11. Add overall observation comments.
12. Choose a measurement unit.
13. Select conditions for Impact, Abrasive, Packing and Moisture and add images.
14. Press back in the bottom left corner.
15. Select the first component -track shoes on the left side.
16. Enter number of shoes and photos for both sides.
17. Press next.
 18. Select the first component under track shoes.
19. Enter images and comments for pin rotation, peening grooves and wing tip damage.
18. Select the first component under track shoes.
19. Enter images and comments for pin rotation, peening grooves and wing tip damage.
 20. Continue through the inspection by pressing the button in the bottom right hand corner
 21. Enter measurement tool, readings, images and comments for each and continue.
22. When you reach the last component on the left side press back in the bottom left corner.
21. Enter measurement tool, readings, images and comments for each and continue.
22. When you reach the last component on the left side press back in the bottom left corner.
 23. Select track rollers on the left hand side.
 24. Enter additional records for track rollers.
25. Press next.
24. Enter additional records for track rollers.
25. Press next.
 26. Continue through each roller wear entering measurements, measurement tool use, adding comments and images.
 27. Press back until you return to the main screen. Press Tumblers.
 28. Enter additional records to tumblers.
29. Press next. Add images and continue.
30. Enter required information for sufficient lubrication, thrust washer present and tooth wear dimensions and return to main screen.
31. Press Front Idlers.
32. Enter additional records for front idlers.
33. Press next. Add images and continue.
34. Enter required information for all options and return to main screen.
35. Continue steps for all required.
36. Complete same steps on right side.
37. Press back in the bottom left corner
28. Enter additional records to tumblers.
29. Press next. Add images and continue.
30. Enter required information for sufficient lubrication, thrust washer present and tooth wear dimensions and return to main screen.
31. Press Front Idlers.
32. Enter additional records for front idlers.
33. Press next. Add images and continue.
34. Enter required information for all options and return to main screen.
35. Continue steps for all required.
36. Complete same steps on right side.
37. Press back in the bottom left corner
 38. Click to select equipment - a tick will appear.
 39. Press sync.
Syncing Inspections from the Mobile App
Once your inspection is completed and you are connected to the Internet – selected the equipment in the screen below and click “SYNC”