
Step 1. START THE INSPECTION
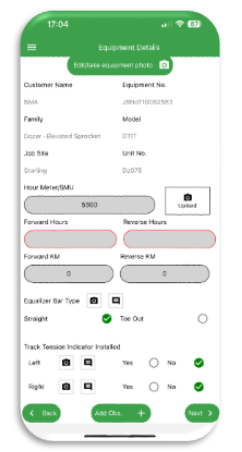
- Choose an equipment from the list to start the inspection. A new page Equipment Details will open. This displays the Equipment Details, such as:- Family, Model, Unit No, Serial No, Customer Name, Jobsite.
- Take an photo of the equipment in landscape mode
- Input the SMU(Hour Meter Reading) – include an image of the Hour Meter Unit if possible
- Enter the forward and reverse distance in kilometres or miles. (Note can swap between metric and imperial in the Settings Menu – access via 3 bars on the top left of screen to open)
- On large Cat dozers, can also enter information about the equaliser bar and the frame configurations. Images are should be included as much as possible.
- Once all complete, click the “Next” button to move to the next page
Step 2. EQUIPMENT CONDITIONS
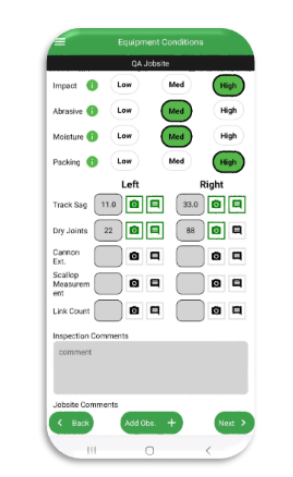
- The following fields are required for User input: Impact, Abrasive, Moisture, Packing
- Can then enter the information for the following fields (Not Required):-
- Track Sag (Left and Right) – chain tension measurement
- Number of Dry Joints (Left and Right) – use infra red camera
- Cannon Extension (Left and Right) – related to track tension and elongation, but ensure not too extended
- Inspector Comments – anything important noted
- Jobsite Comments – specific about jobsite
- Take images and add comments. The images tell a story far quicker than words. Take images in landscape.
- Once complete, click “Next” button
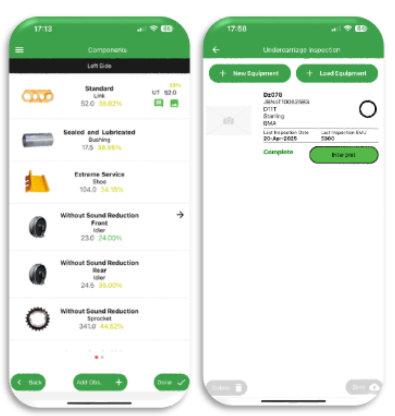
Step 3. Navigate to Summary Components and start Inspecting
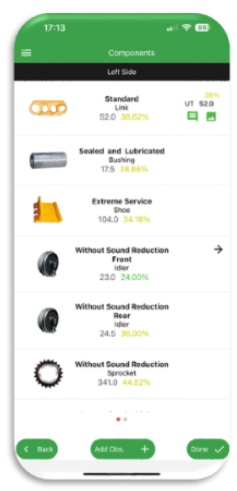
- Can select by swiping left and right to select the side to start inspecting.
- Summary displays previous inspection results as well as which components are inspected with images and comments icon. Current inspection results displayed on the right column
- Click on a component to inspect that component
Step 4. Entering the Inspection Data
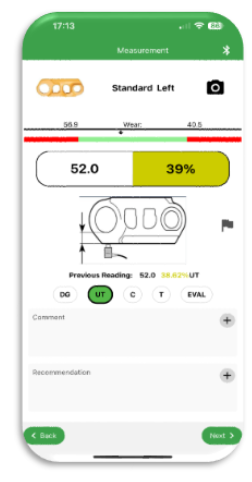
- This screen displays from top to bottom, first the Blue Tooth button to connect to the Ultrasonic Tool – this turns blue when on. Ensure blue tooth communication set to on in the Cygnus Tool. Also need to select UT as the tool
- Component and camera to take up to 5 images, turns green once image taken
- limits 0 and 100% worn in mm or inches depending on your preference selected
- Reading Input and percent worn calculated once reading has been inputted
- Measurement image for the tools selected
- Flag if this needs to be raised as an alert to a supervisor
- Previous reading with measurement, % worn and Tool used
- Tool selection – only those tools for the specific component will be available and Evaluation which can be used if not sure.
- Comment with Auto Comments indicated with Plus sign – can select and then add further comments by typing
- Recommendations are the Maintenance Actions needed in the future to rectify the current condition where required.
- Click the “Next” button to move to the following component. Hit the “Back” button to navigate back to the Summary screen.
Step 5. Additional Observations
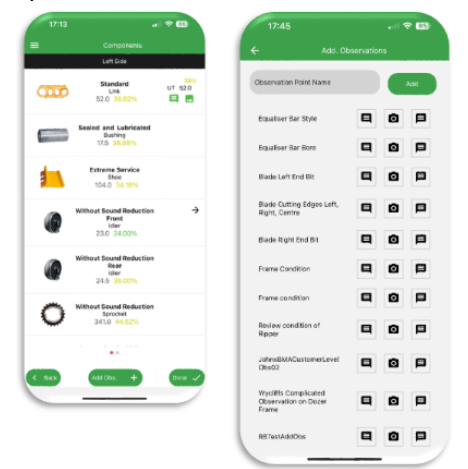
- This screen is accessed by clicking on the Add Obs + button at the bottom of the screen. This will open the following screen
- Additional Observations allow the recording of any further information for the equipment. Observations can be setup against a family of machines so the same observations appear each time the machine is inspected.
- Observations can be added in the field as you inspect.
- In the Observation Point Name, add in the observation point, and click the Add button
- The observation will appear at the bottom of the screen along with entry of a comment and images.
Step 6. Completing the Inspection
- Once the inspection is complete, hit the Done” button at the bottom of the screen which completes the inspection.
- The inspection will now appear back on the main menu, and can be accessed again until it has been synced.
- Note, only sync the inspection when in a good wifi or mobile communication area.
SYNCING THE INSPECTION
Step 1 Selecting the Equipment to Sync
- When all inspections to all equipment are done, the results are ready to be synced to the main app. [NOTE: Inspecting all components in the list is not required. A User can choose to inspect one or two components only, HOWEVER needs to always do it for both Left and Right sides – Section 8.2.]
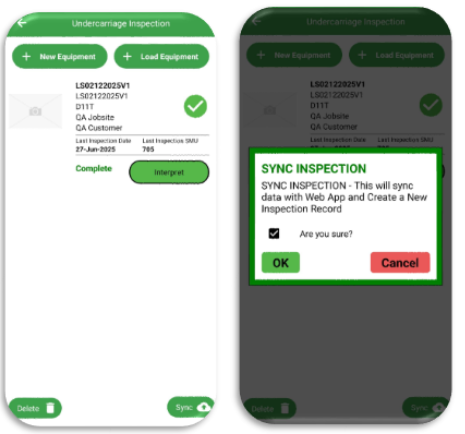
- In the Undercarriage Inspection Screen, select the equipment by ticking the round circle for each equipment to be synced.
- Ensure the Wifi signal or mobile signal is strong enough.
- Click the Sync button – this will send all of the data and images back to the web