
Inspections can be entered via the Mobile Application or from the Web Application (web browser). For help with entering inspections from the Web Application, please see ‘Record an Inspection – Web App‘. Ideally inspections done on the Mobile App are performed on equipment that has already been setup in the system. You can setup equipment on the Mobile App, but it is not our recommended method, we recommend setting up equipment in the Web Application first. To setup equipment from the Web App see ‘Setting Up, Searching for and Editing Equipment‘. There may be occasions when you need to setup equipment on the Mobile App, and that is covered at the end of this guide.
Inspecting Previously Setup Equipment
Once you have logged into the Mobile App, there are 3 phases to performing an inspection, loading the equipment into the App, entering the inspection and syncing the inspection with the system. If you have not already done so, install the Mobile App on your device. For assistance with installing the Mobile App see ‘Download and Install UC Inspection App to a Mobile Device‘.
Opening and logging in on the Mobile App
- Locate the App on your device and tap the icon to open it.

- On the Login screen that is displayed, enter your ‘Username’ and ‘Password’.
- To ensure you can use the App for entering inspections or creating new equipment when you are not connected to the Internet, make sure to tick the ‘Remember Me’ box.

- Click ‘LOGIN’ and you will be taken to the ‘Undercarriage Inspection’ home screen.


Before going to the site where there may be no Internet access, the equipment needs to be loaded into the App. This can be done at anytime before the inspection, as long as you have Internet access.
- From the ‘Undercarriage Inspection’ home screen, click ‘Load Equipment”
- Start typing the customer name and select it when it appears.

- Select the Jobsite and then the model to narrow down the equipment list.
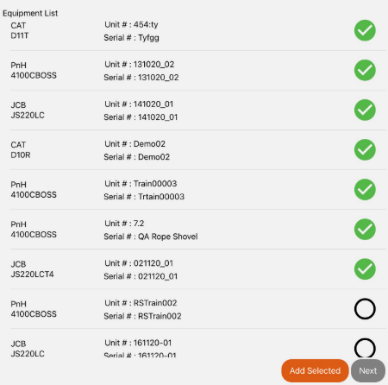
- Select the Equipment you want and then click ‘Add Equipment’
*NOTE* You may need to close your keyboard using the ‘back’ button on your device to view the entire list.

- Repeat the steps to add all the equipment you need for your next inspections.

Entering an Inspection
Once you have added your equipment, the ‘Undercarriage Inspection’ home screen will now have your equipment listed with a label showing if the inspection has been started or not.
- Click the Equipment you are inspecting to open the ‘Equipment details’ screen. *NOTE* Do not click the tick box.
- Enter the SMU.
- Click ‘EQUIP CONDITIONS’ to open the ‘Jobsite Conditions’ screen
- Select the rating for ‘Impact’, ‘Abrasion’, ‘Moisture’ and ‘Packing’. More definitions of these ratings see ‘Job Site Conditions‘
- Enter values for ‘Track Sag‘, ‘Dry Joints‘ and ‘Ext. Cannon‘
- Enter any ‘Inspection Notes’ and/or ‘Jobsite Notes’.
- Click ‘INSPECT” to open the ‘Inspection’ screen. The ‘LEFT SIDE’ will be displayed first.
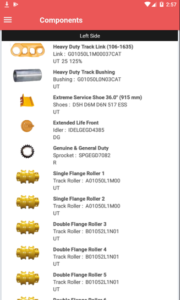 *NOTE* For details on measuring different components see our ‘Component Measuring Guides‘
 - Click on the component you are measuring to open the Measurement Screen.

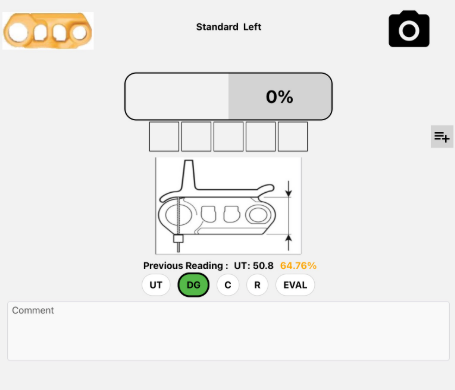
- Select how the measurement was taken
- UT – Ultrasonic Tool
- DG – Depth Gauge
- C – Calipers
- R – Ruler
- Enter the ‘Reading’ (measurement) and add any notes.
*NOTE* If measuring with the Ultrasonic Tool, when the reading output is stable, hit the ‘Freeze’ button to record the reading. - Click the camera icon to add photos.
*NOTE* We strongly advise that your device camera settings be set to a lower resolution to minimize the image file size. Generally the lowest setting will be sufficient. - Click ‘Save’ to return to the ‘Inspection’ screen and select the next component.
- As measurements as entered, the ‘Inspection’ screen will display the measurement and wear % of components you have measured.
- Once you have completed the ‘LEFT SIDE’, swipe left on the screen to access the ‘RIGHT SIDE’.
- Repeat Steps 8 to 13 for the ‘RIGHT SIDE’
- Once all measurements have been entered click ‘END INSPECTION’ to return to the ‘Undercarriage Inspection’ homescreen where you can select the next piece of equipment you are inspecting.
- If you have Internet access you can Sync inspections as you go, otherwise you can just save the inspections and sync them all later when you do have access. See below for a guide to the sync process.
